This update brings more than just polish—it’s the foundation for a faster, more fluid design experience, built around the way Copilot is used today and the way we see it evolving tomorrow.
Designing an AI pin would normally take months, but in this project, we did it in hours. In our step-by-step guide, you'll see how Flux can accelerate your design process and bring your AI pin project to life.
Flux's mission is to make hardware design accessible and efficient for everyone. Our powerful AI Copilot acts as your personal design assistant, streamlining the process and allowing you to create sophisticated hardware in a fraction of the time. In this blog, we'll show you how to leverage Flux to design your own AI pin in just a few hours.
Designing an AI pin would normally take months, but in this project, we did it in hours. In our step-by-step guide, you'll see how Flux can accelerate your design process and bring your AI pin project to life.
Without Flux, a project would need to start from scratch. With Flux, you can kickstart your project by selecting a ready-made template from Flux’s extensive library. These templates provide a solid foundation, allowing you to focus on customizing and refining your design rather than starting from scratch.
Next, use Copilot to generate and refine block diagrams. Instead of brainstorming with a team, which you might not have access to, you can use Copilot's conversational interface to ask questions, request changes, and iteratively improve your design until it perfectly suits your project needs.
No more sifting through Mouser or Digi-Key, researching hundreds of components, reading through datasheets one by one. With Copilot's help, find and integrate the best components for your design. Copilot assists in researching part numbers (MPNs) and suggesting optimal components, ensuring your AI pin is built with the best available parts.
Once parts are selected, it’s time to wire up your schematic. Normally this would require comparing datasheets one by one to figure out interconnections. With Flux, Copilot does all of the heavy lifting for you. Automate netlist generation and component configuration with Copilot’s assistance by having it tell you which pins connect where and even watching it wire up components for you. This step simplifies the intricate process of connecting different parts of your design, allowing you to focus on innovation rather than manual configuration.
Working alone but need another set of eyes to review your project? With AI guidance, you can perform thorough design reviews and finalize your layout. Copilot helps you compare your design to datasheets and common practices, ensuring accuracy and reliability. It also extracts the necessary equations to check your calculations, giving you confidence in your design.
Ready to get started? Watch our tutorial video for a detailed, step-by-step walkthrough of the design process. Then, open the example project and follow along to create your own AI pin. You'll see firsthand how Flux and Copilot make hardware design faster, easier, and more fun.
Experience the future of hardware design today. Sign up for Flux, open the project, and start designing your own AI pin. Discover how AI can transform your design process, unlock the power of Copilot, and achieve rapid results.
Join the revolution of AI pins — sign up for Flux and start creating now!
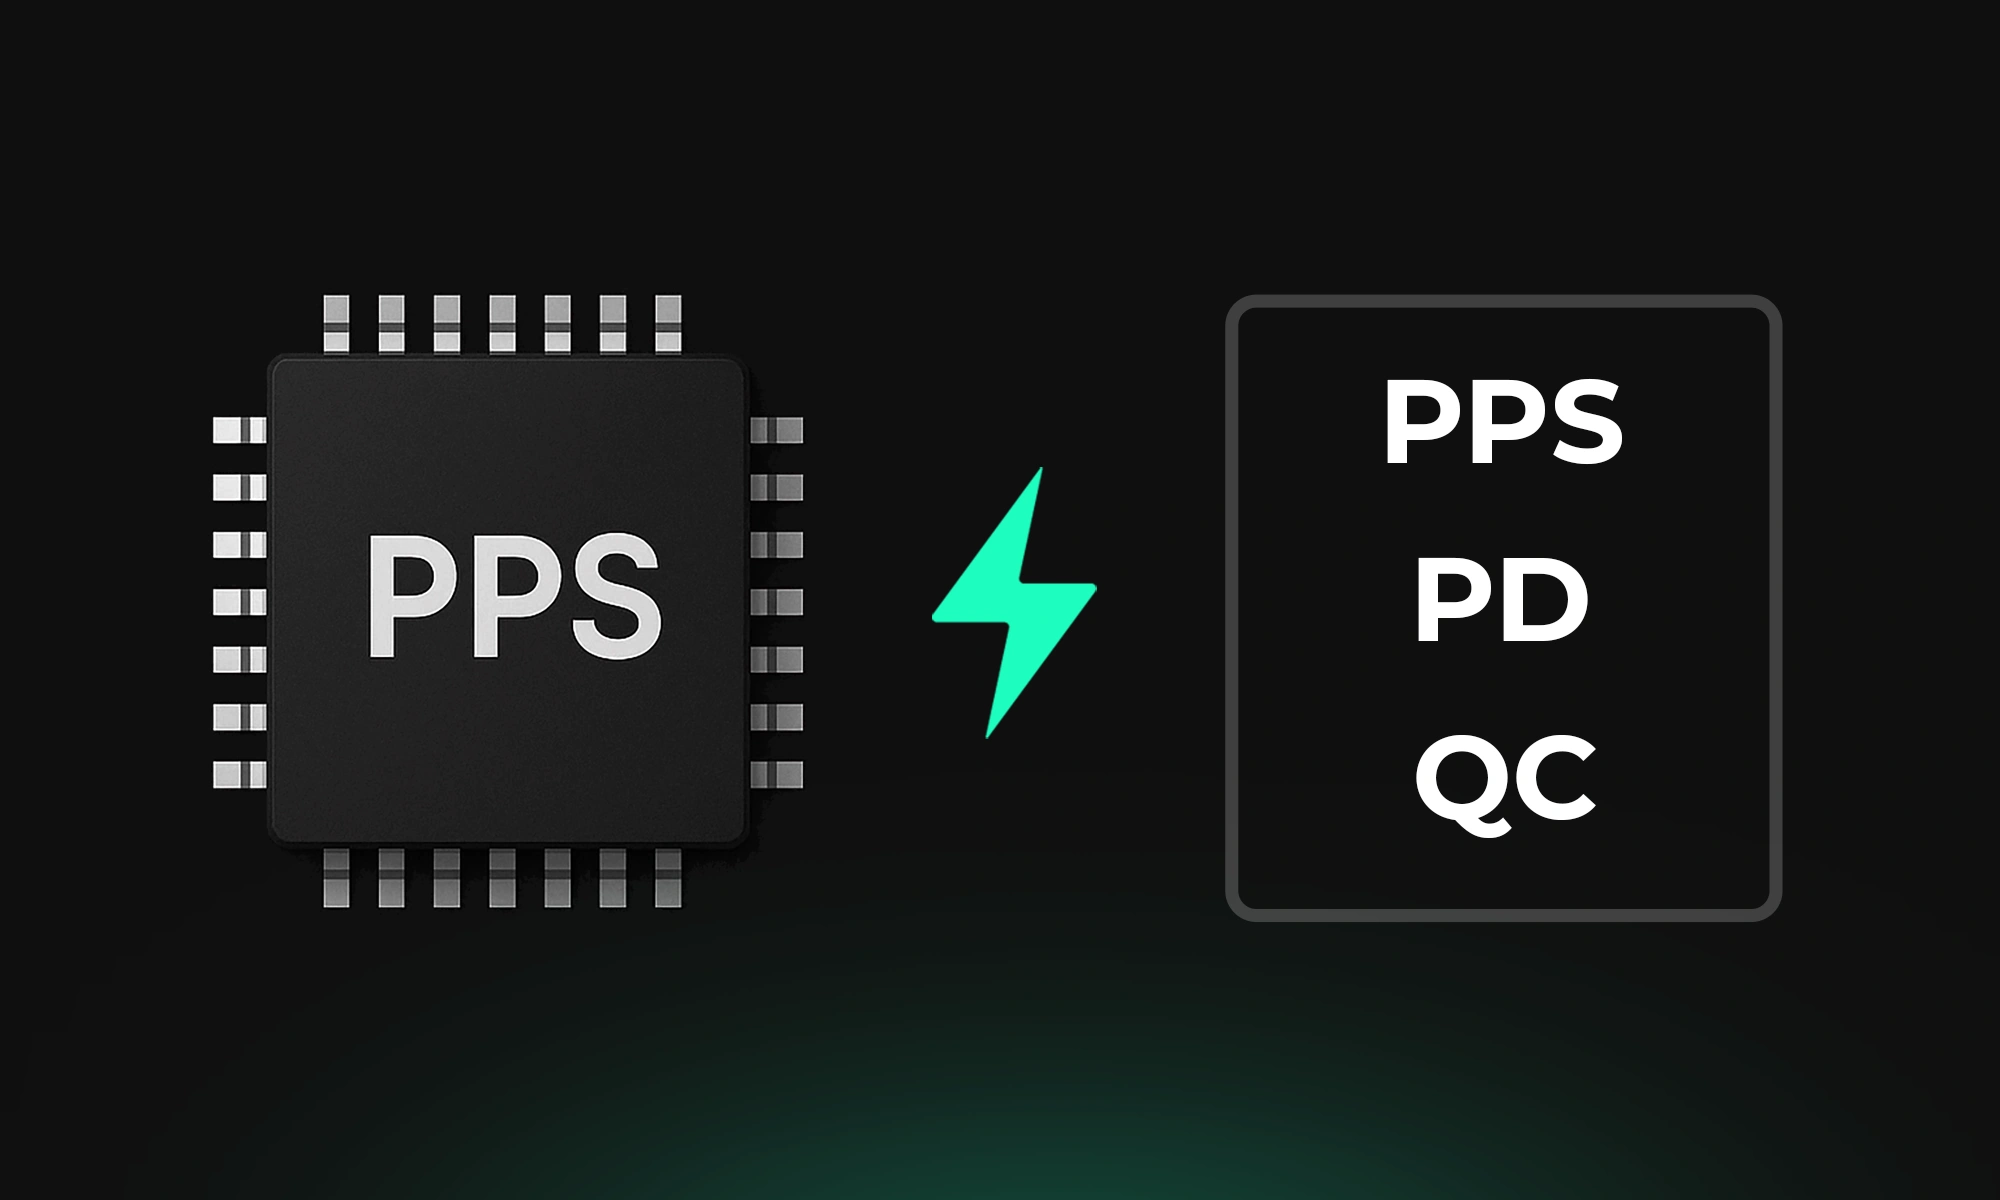
Fast charging has come a long way—and one of the most advanced technologies in this space is Programmable Power Supply (PPS). If you’ve ever wondered why your device charges faster with some cables and adapters than others, PPS might be the answer.
PPS (Programmable Power Supply) is an extension of the USB Power Delivery 3.0 (USB PD 3.0) standard, introduced by the USB Implementers Forum (USB-IF) in 2017.
What makes PPS unique? Unlike traditional fast charging that delivers a fixed voltage, PPS dynamically adjusts voltage and current every 10 seconds, based on what your device actually needs at any given moment. This real-time communication between your device and charger leads to:
PPS support is becoming more widespread in premium devices. Here are a few well-known examples:
Here are some widely used ICs (Integrated Circuits) that power these fast-charging protocols:
PPS fast charging isn’t just about speed—it’s about smarter, more efficient charging. By dynamically negotiating voltage and current, PPS reduces heat, protects battery health, and delivers a better experience for power users.
If you're designing or sourcing power solutions for modern electronics, make sure your charger and cable support PPS. And if you're a developer, integrating chips like the STUSB4761 or TPS25750 can give your products that next-gen charging edge.
Want help selecting a chip for your power design or building your own PPS-compatible device? Let’s build it together.
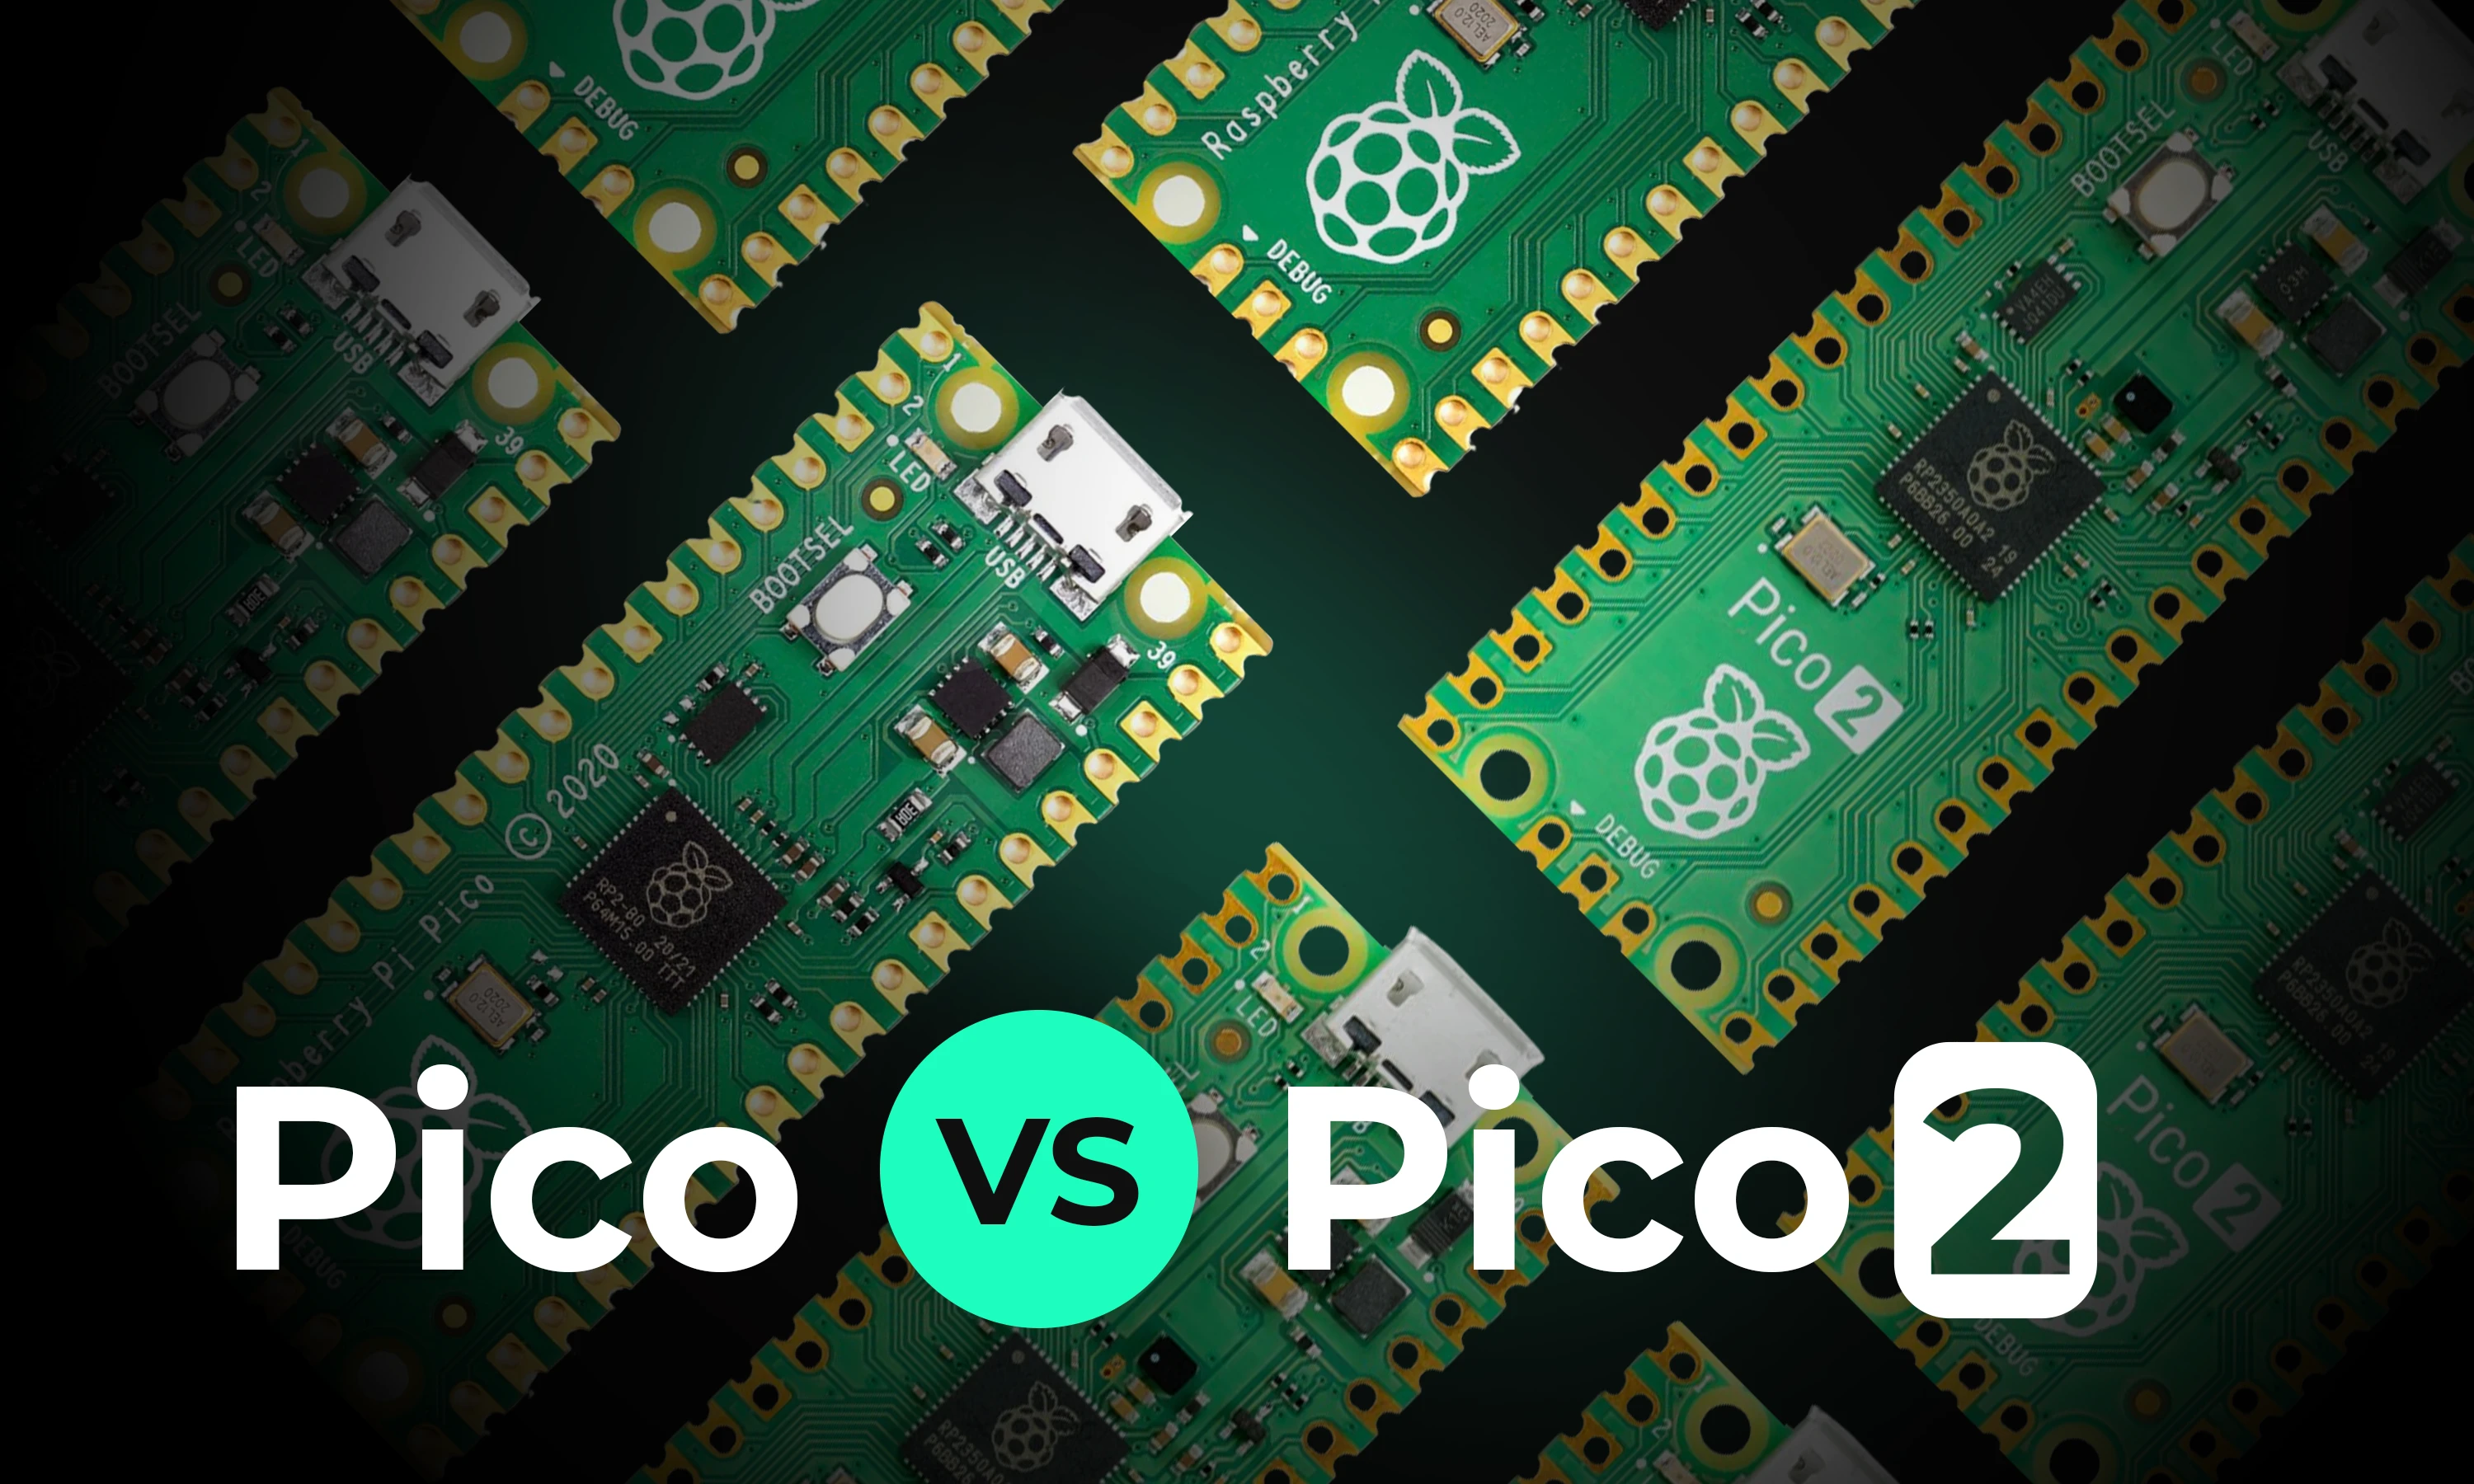
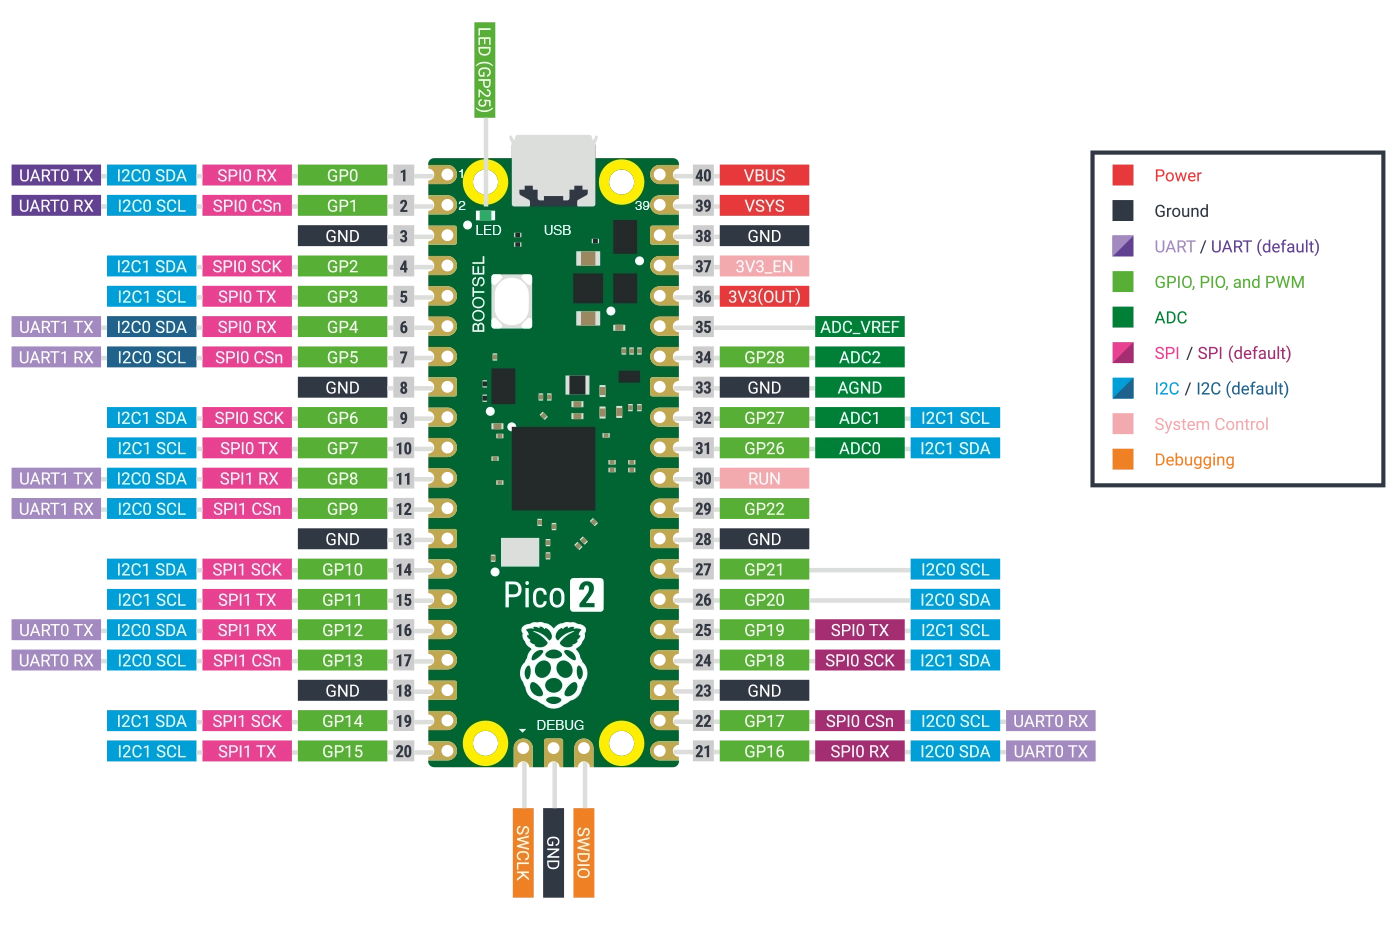
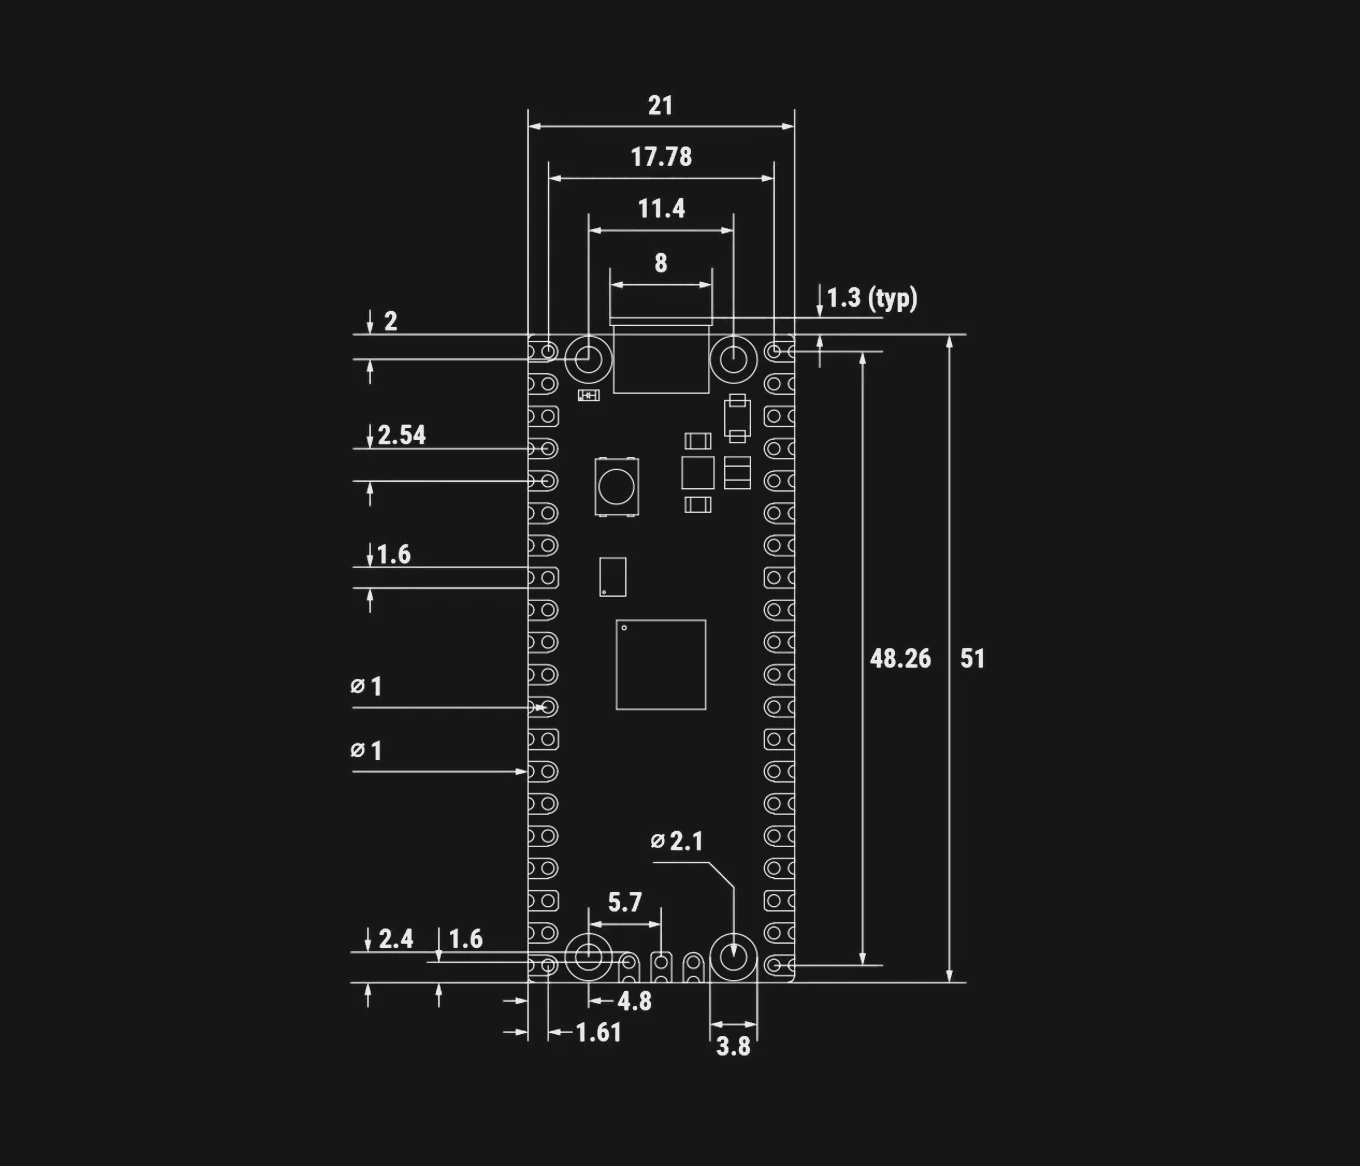
This article will explore the key differences between the original Raspberry Pi Pico and the new Raspberry Pi Pico 2, focusing on the most significant enhancements and what remains unchanged.
This article will explore the key differences between the original Raspberry Pi Pico and the new Raspberry Pi Pico 2, focusing on the most significant enhancements and what remains unchanged.
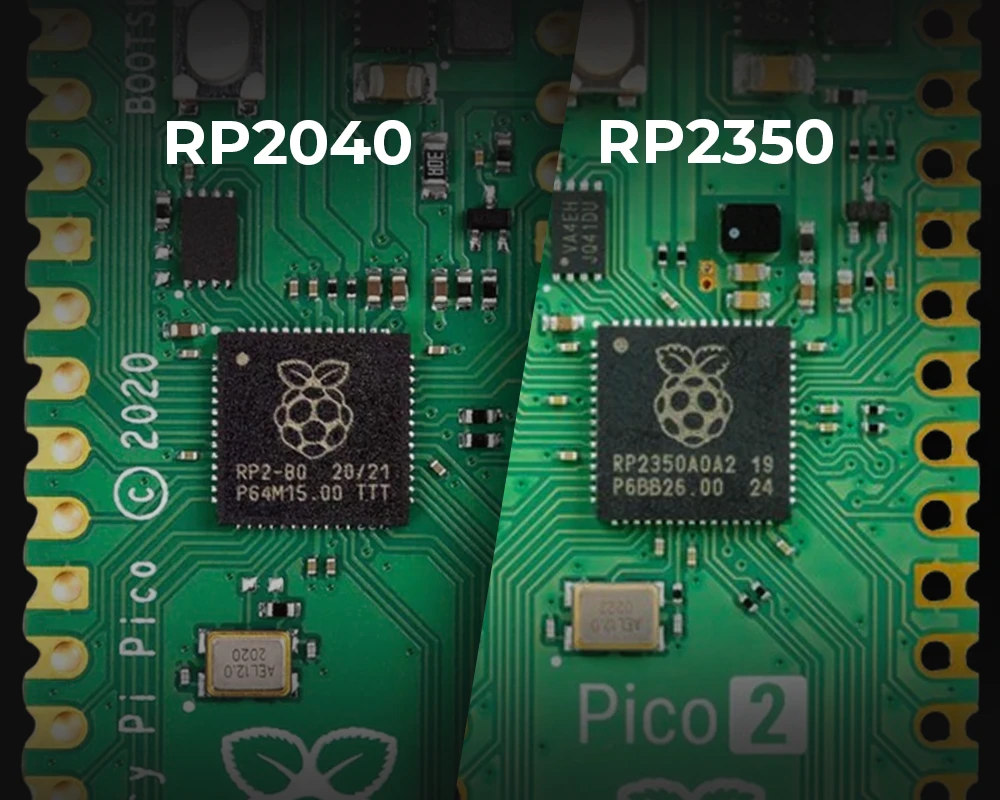
The Raspberry Pi Pico 2 introduces several new features that set it apart from its predecessor, making it a more powerful and versatile microcontroller:
{{insert-project-1-here}}
Discover how the Raspberry Pi Pico 2 outshines its predecessor, Raspberry Pi Pico.
{{insert-project-2-here}}
{{insert-nico-video}}
The Raspberry Pi Pico 2 builds on the foundation laid by the original Pico, offering enhanced processing power, more memory, and advanced security features, all while maintaining the same form factor and price point. The introduction of RISC-V cores in the RP2350 is particularly exciting, signaling a new direction for the Raspberry Pi platform. Whether you're working on a new project or considering an upgrade, the Pico 2 provides a seamless transition with backward compatibility and forward-looking features.
As software support catches up with the new hardware capabilities, especially for the RISC-V cores, the Raspberry Pi Pico 2 is set to become an even more powerful tool in the maker community.
Join the evolution of microcontrollers — sign up for Flux and start innovating with the Raspberry Pi Pico 2 today!
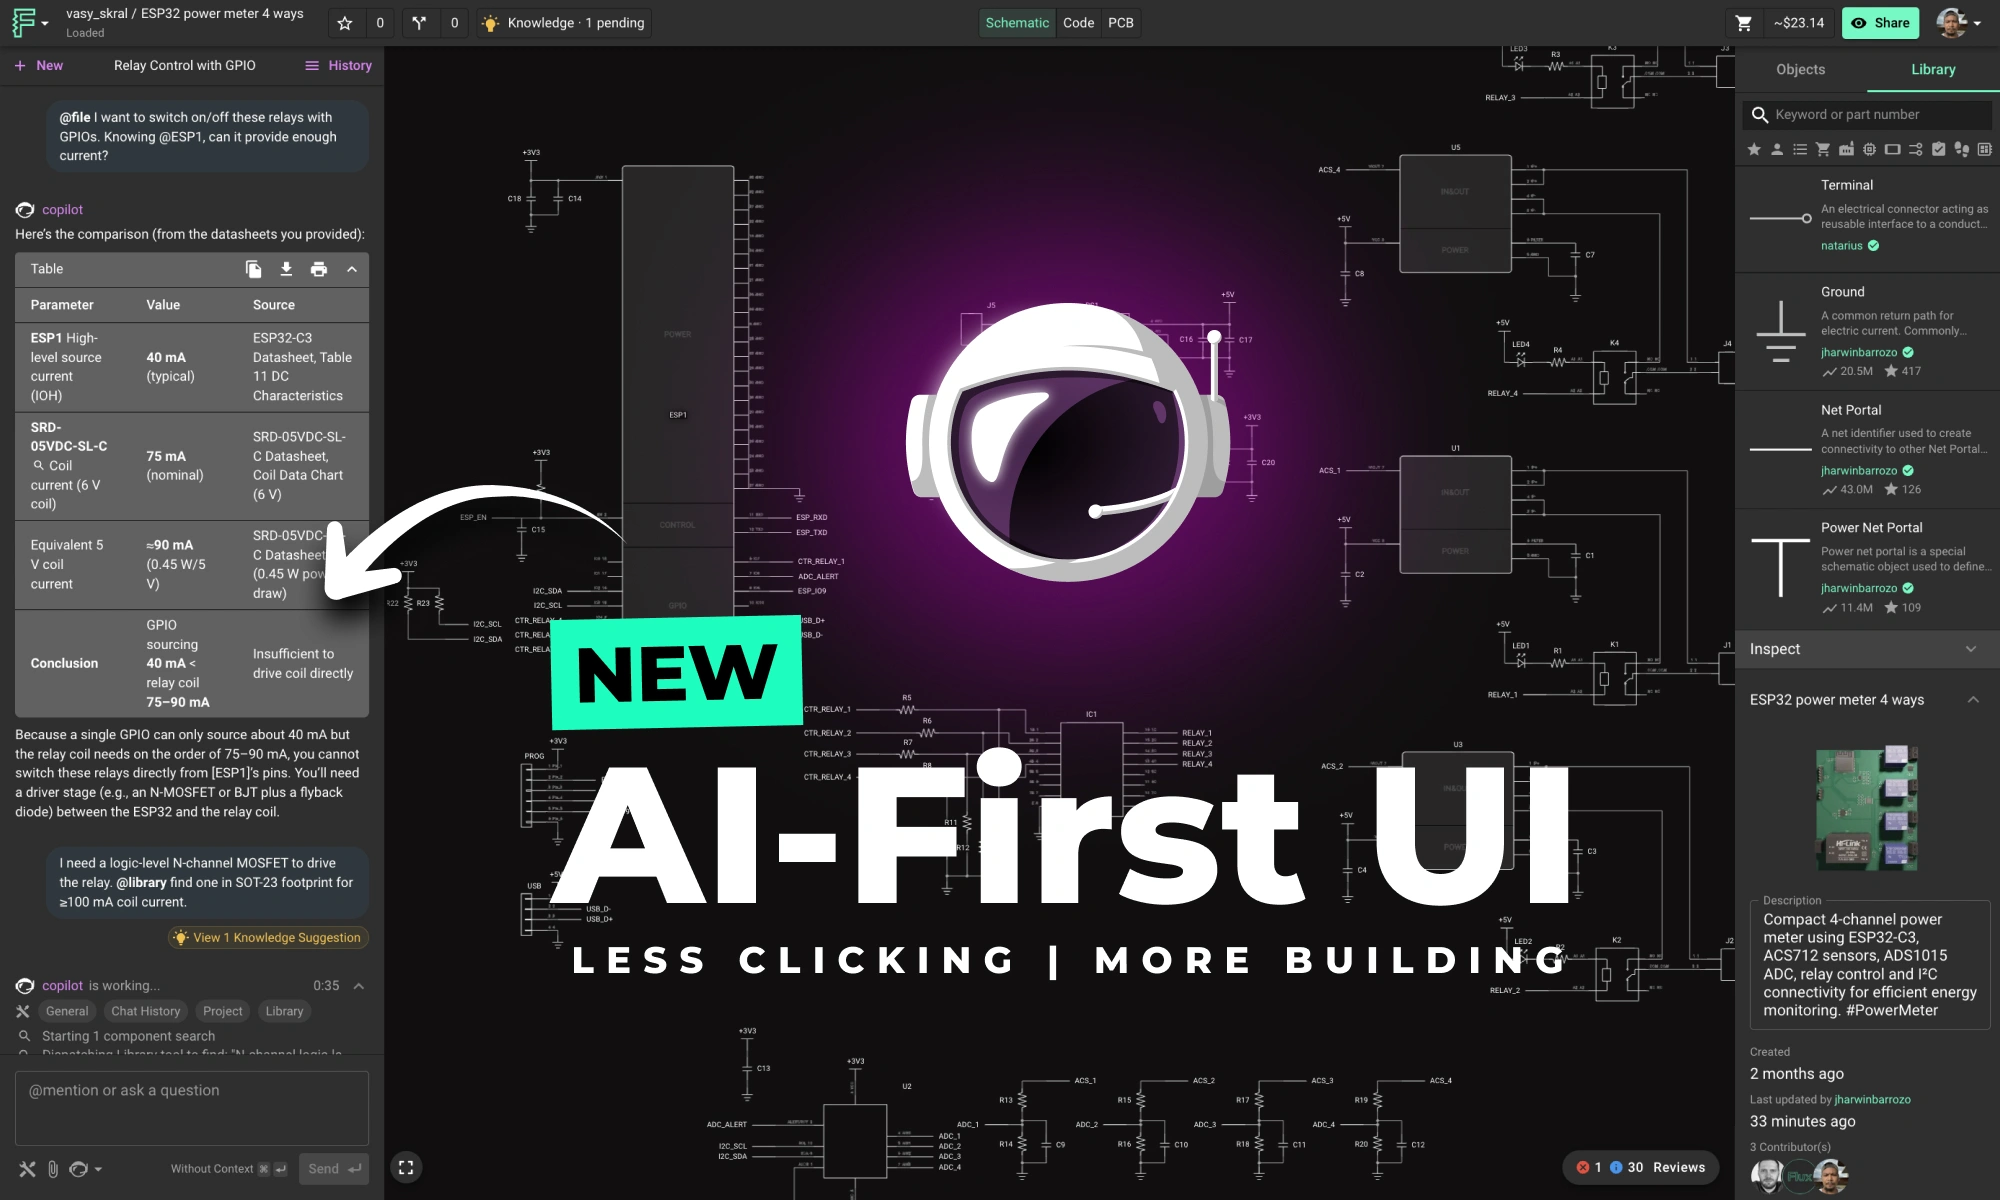
Copilot new access to Flux’s live pricing and availability tools so that it can do the supply chain and cost analysis for you. Read on to learn about how we’re leveraging AI to give you the power of an entire supply-chain team right at your fingertips.
At Flux, we want to ensure that your designs are functional and manufacturable—and that means making it easier to navigate the supply chain. That’s why we’re excited to announce a new end-of-life (EoL), not recommended for new designs (NRND) warning feature that automatically flags if components are at or near obsolescence. We’ve also given Copilot new access to Flux’s live pricing and availability tools so that it can do the supply chain and cost analyses for you.
When you’re creating a design that will eventually be manufactured, it pays to start off on the right foot. From the very get-go, it’s imperative that you design with components that are sourceable and will remain in production for the distant future.
With these warnings presented before you select a component, you’ll catch issues earlier in the process and avoid future supply-chain challenges before they even happen. And it doesn’t take a team to do it. Let Copilot and the Flux schematic editor do the heavy lifting for you—all under the roof of one centralized design tool.

Now you’ve got a design consisting of sourceable components with long-term viability. When looking toward manufacturing, you also want to cost-optimize your design to make it as affordable as possible.
With Copilot’s newfound access to Flux’s real-time availability and pricing tools, cost optimization becomes a breeze. Simply ask Copilot,
“@copilot, use real-time pricing data to help me find a more affordable alternate for U1”.

Copilot will then scour the internet and the Flux library, searching for the best component replacements that save you money without sacrificing your original design’s functionality. You no longer have to do all the manual work yourself. No more need to open a dozen tabs, clicking between datasheets and suppliers to find the best alternates. Instead, Copilot automates the whole process for you so that you can feel confident you have the most cost-efficient design possible.
Once your product is manufactured and on the market, the Engineering and Operations teams are still responsible for sustaining the project. That means monitoring changes in component availability and pricing to keep your production line up and running.
With Flux’s new features, this is all done for you.
If a component in an existing design is facing obsolescence, the warning indicators will appear directly on the schematic editor for everyone on your team to clearly see. Or, maybe you want to do an occasional check of your design just to be safe. In that case, you can prompt Copilot to do a BoM analysis for you by asking,
“@copilot, please analyze my bill-of-materials to check if any of my components have reach end-of-life, or if they’re at risk to do so”.

Like an entire supply-chain team at your disposal, Copilot will thoroughly compare your design against data from the world’s leading suppliers to ensure that all of your components are viable options for production. If not, Copilot will alert you accordingly, and even help you find alternates with better long-term prospects.
We want to make hardware less hard, and that means we need to give you, the designers, less things to worry about. With new End of Life Warning Indicators and Copilot’s newfound ability to access and analyze real-time Availability & Pricing information, we’re giving designers the power of an entire supply-chain at their fingertips. Want to experience how Copilot can ensure your design is ready for manufacturing? Start a design on Flux today!
We wanted to bring the power of Python directly into our users' hands so that you can augment your workflows with custom scripts that automate your design and analysis tasks. That’s why, today we’re excited to be introducing Copilot’s Code Interpreter.
Flux Copilot is already the most powerful chat-based AI design assistant for PCB design, but what if we told you it just got even smarter?
Code Interpreter is the newest tool in Copilot’s arsenal. With access to a built-in Python code interpreter, Flux Copilot can now generate and run Python scripts directly in conversation with you. That means that you can automate workflows, analyze data on the fly, and create custom visualizations without leaving the chat interface.
The result? Your team can solve problems more effectively, work faster, and reduce the risk of errors.
To work with Code Interpreter, simply ask Copilot to perform an analytical task or solve a problem and, in some instances, specify that you’d like it to use Python in the process.
First, Copilot will meticulously describe the steps it takes and its line of reasoning in solving the problem. Then, it will generate a comprehensive Python script for you accordingly, including everything from library imports to function definitions. Finally, Copilot will use its new Code Interpreter powers to execute the script, exporting the results in whatever format you specify.
With Code Interpreter, Copilot can provide tables, plots, and charts that help you better organize, visualize, and understand your project.
Need some examples of the ways that Code Interpreter is a game-changer for Copilot? Check out some of the most compelling use cases we’ve evaluated so far.
EEs often have to refer to datasheets in the design process to figure out device performance specifications, tolerances and ratings.
For example, when choosing current-limiting resistors, like in LED circuits, it's important to design for a specific current flow and power consumption and then size the resistors accordingly based on information in their datasheets. With Code Interpreter, Copilot can use Python to do this analysis for you and then compare your design to the expected results. For example, if a resistor is undersized for an expected power, Copilot can flag this and help you find a better component for your design.
Check out this example in action here.
Sometimes, EEs refer to datasheets to extract equations to guide their design efforts, like in the case of regulator designs.
The process of voltage regulator design requires designers to appropriately size the peripheral components for a given output voltage and current. These values are often based on equations given by the component manufacturer in the datasheet. Instead of manually calculating the needed component values, you can use Copilot’s Code Interpreter to do it for you. Looking at your programmable regulator IC, the design information in its datasheet, and the context of your circuit and project requirements, Copilot creates a Python script that calculates what passive components such as inductor, input and output capacitors and resistor values are ideal. You’ll even get multiple options to pick from, so you maintain freedom in your design choices.
Check out this example in action here.
Relatively complex mathematical equations govern the behavior of analog filters. Instead of calculating poles and zeros to graph a transfer function manually, ask Copilot to do it for you. Copilot can use Code Interpreter to analyze your circuit, calculate the frequency response, and plot your transfer function. You then have access to a detailed plot to review and Copilot-created design feedback and recommendations based on the results.
Check out this example in action here.
Determining your system’s overall power consumption can be tedious and arduous. Done manually, the process entails calculating each component’s power consumption and then adding these up individually to estimate the total system value.
With Code Interpreter, Copilot does it all for you. Copilot can analyze your circuit to understand each component’s power consumption, reading through datasheets where necessary to get reliable figures for active components. Then, it can determine your system’s total power consumption and create charts to help you visualize the major contributors to your system’s power draw.
Check out this example in action here.
Another tool in Copilot’s belt, Code Interpreter, makes Copilot more powerful than ever. Now, your team can automate otherwise manual workflows with the power of Python, letting you work more effectively and quickly than in the past. Want to see the power of Code Interpreter in person? Start a new project with Flux today!
Increase your PCB design productivity with Flux Copilot's new AI shortcuts. Automate tasks, optimize designs, and reduce errors.
With Copilot Shortcuts, there is no more crafting the perfect prompt or reading through documentation to figure out what Copilot’s strengths and weaknesses are. To access Copilot Shortcuts, simply right click a component or project in Flux and choose the prompt you want to use. In the past year, users have had access to a handful of Copilot Shortcuts, including;

Today we’re excited to announce the addition of 8 new Copilot Shortcuts so that your team can get the most out of Copilot with the least prompting effort possible.
Now, after much feedback from users and rigorous testing on our end, we’ve created a set of new prompts that are commonly useful to engineers and are written in a way to guarantee the best results possible.
The new prompts we’re adding include
As you work with Flux Copilot, please let us know which use cases and workflows are most valuable by joining our Slack Community. Together, we can revolutionize PCB design by automating tedious and error prone workflows so you can focus on what you enjoy doing most!