
In this post, we’ll show you exactly how to unlock the power of Flux Copilot for yourself: from writing rock-solid triggers to scoping entries at the project, user, and system levels.
Imagine a future where your most complex PCB design challenges are met with an intelligent AI assistant, capable of handling everything from component selection to compliance checks. Read on to discover how Copilot, embedded within the Flux platform, is turning this vision into a reality, liberating electrical engineers to focus on what truly matters: innovation.
If menial tasks are corroding the magic you once felt building electronics, you are not alone. Aerospace engineers once relied on protractors and books of mathematics tables, and early semiconductor circuits were laid out manually with scalpels and stencils. From computer-aided design to EUV photolithography, new tools opened new frontiers of possibility, letting engineers spend more and more time solving interesting problems instead of doing busywork.
That’s why we built an AI assistant for designing electronics: Flux Copilot. It removes the drudgery for electrical engineers, helps you move faster, and make less mistakes so you can focus on inventing breakthrough products.
When you open Flux, Copilot is waiting for you in the chat. Brainstorming how to approach a particular PCB design? Struggling to fix a stubborn bug? Just ask, and Copilot will respond instantly with suggestions tailored to your project—you can even ask it to wire up schematics or review a design. It's not just a tool; it's your design partner.
Under the hood, Copilot coordinates a team of AI models that collaborate to interpret, research, analyze, and respond to your query. When you ask a question, it remembers your chat history, accounts for project requirements, references relevant datasheets, checks parts availability, and vets comparable options before responding. By drawing on this rich context, Copilot manages its array of specialized models and evaluates results in order to generate the best response to your query.
LLMs add a new layer to the top of the software stack—transforming natural language into a programming language so you can communicate with computers in your native tongue instead of code. So the best way to use Copilot is to treat it like a partner: talking through problems, refining questions, and iterating solutions together. More conversation means more context for it to leverage on your behalf.
Copilot is a tireless deputy dedicated to accelerating your creativity. Hobbyists are using it to build side projects. Entrepreneurs are using it to add new lines of business. Teams at Fortune 100s are using it to inform designs and streamline design reviews. But we’re just getting started.
Imagine you're part of a team that's been tasked with innovating the next generation of wearable health monitors. Stringent design constraints include ultra-low power consumption, medical-grade accuracy, and real-time communication with healthcare providers. A small mistake in component selection could result in a device that fails to meet regulatory standards.
You fire up Flux and initiate a chat with Copilot:
@copilot, we're working on a medical wearable with these specs...
Copilot begins by validating your high-level requirements against current medical standards. Within moments, a list of components that meet your specifications appears on your screen. The AI also generates a basic schematic layout.
Copilot: Based on your specs, here's a rough schematic design with MCU chips, sensors, and power management ICs that fit your criteria. What do you think?
An interactive schematic layout appears on the screen alongside the chat, making it easier for you to visualize the system design. Copilot also estimates the battery life based on the initial schematic and offers to set up notifications for when certain components go on sale or get updated.
Copilot: Looks like our initial Bluetooth choice might consume too much power. How about this low-energy alternative?
The suggestion comes with a recalculated power budget, helping you make an informed decision quickly.
Once the schematic is confirmed, Copilot transitions to creating a basic PCB layout:
Copilot: We're good to go on the schematic. Let's talk PCB layout. I see your mechanical engineering team has constraints for the device enclosure. Shall we coordinate?
You agree, and Copilot generates an initial PCB layout. It also reaches out to your mechanical engineering team to get the constraints for the device enclosure. Within moments, an algorithmically generated 3D enclosure model appears on the screen, designed to perfectly fit your PCB.
Copilot: Here's an auto-generated enclosure that meets the mechanical constraints and fits the PCB layout. How does it look to the team?
After some back-and-forths between your electrical and mechanical teams, facilitated by Copilot, you arrive at a finalized design.
Copilot: Looks like we have a winner! I'll go ahead and run a mock compliance check and notify the firmware team for the final integration.
Fast-forward a few months, and your device is not only meeting but exceeding expectations. Copilot assists in generating the documentation needed for formal compliance checks and eventual mass production.
In the Marvel Cinematic Universe (MCU), Tony Stark uses his trusty AI, J.A.R.V.I.S., to build his Iron Man Armor. When Tony has an idea, J.A.R.V.I.S. is always there—relentlessly competent—to transform that idea into reality. J.A.R.V.I.S. understands what Tony needs and taps the relevant resources to make it happen, extending his agency and increasing the leverage of his decisions.
In many ways, J.A.R.V.I.S. represents the kind of AI that Copilot is evolving toward: a tool that empowers you to make anything you can dream up. But in the movies, Tony is a billionaire and J.A.R.V.I.S. is his and his alone, while Copilot is open to everyone, democratizing access to exclusive domains like electrical engineering. Imagine an MCU where everyone has a J.A.R.V.I.S. working tirelessly on their behalf to improve their lives and world. Thanos wouldn’t stand a chance. That is the kind of abundant future we seek to realize.
One day, Copilot will grok your entire supply chain. It will be able to handle any design task you want to delegate. It will accelerate your creativity by making atoms as malleable as bits. That’s how it will earn the J.A.R.V.I.S. analogy. That’s how it will help you build anything you can possibly imagine, making good on Arthur C. Clarke’s injunction that “any sufficiently advanced technology is indistinguishable from magic.”
So how will you make things better by making better things? We can’t wait to find out.
We’ve been so amazed with the ways you’ve used Copilot to brainstorm, debug, and conduct part research that we’ve compiled some of our favorite prompts you can copy and paste, or modify for your own use!
Copilot prompts are natural language inputs given to a custom-trained large language model (LLM) specifically designed to understand the principles and methodology of electronics engineering, circuit design, schematic design and PCB design.
For example, if the prompt is
"How would I connect ILI9341 and SPI TFT LCD?"
the model will generate an answer in a human-like manner based on the prompt. And because Copilot lives inside the PCB design tool, not only it provides direct feedback, advice, analysis, and with your approval - it can take action, through a simple chat interface. With just press of a button, Copilot can connect components together.
The future of hardware design is already here with Flux Copilot, offering a new and faster way for hardware engineers to work, making it more fun as well. Learn more about Flux Copilot.
Feel free to share your favorites on our Slack Community.
Discover our latest schematic design updates that streamline wire adjustments, component alignment, and intuitive pin connections, making your design process faster and meeting your high standards for precision. These enhancements, coupled with our AI design assistant, ensure a solid foundation for your projects.
Traditionally, the process of fine-tuning wire positions on a schematic felt akin to rewriting an entire chapter of a novel for just a few key edits. Crazy!
With Flux, the narrative changes. Enabling the meticulous adjustment of wire positions without the need to start from zero, we've introduced a drag-and-drop feature for individual wire sections. This allows you to artfully navigate around objects, symbols, and components, ensuring that every wire is precisely where it needs to be.

We've also tackled the pesky issue of fragmented line segments—those tiny, unnecessary elbows in your schematic that disrupt the visual flow. Now, parallel wire segments snap and merge into a singular, streamlined line. This eradicates clutter, simplifying your schematic into a model of elegance and simplicity.
💡 Tip: you can also use ctrl/cmd+click to select an entire net at once!
We wanted to make creating connections more intuitive and faster. So we created some new ways to connect components and draw wires that’ll have you working at lightning speed.
Now you can connect components simply by dragging them onto one another. Drag a component until one or more of its pins are on top of the pins from another component, then drop it. Instantly, the overlapping pins become connected. You can leave it there, or drag it away to see the wires. For many cases, this could save you two or more clicks, speeding up your workflow.
Connecting components to existing wires is now a breeze. Drag a component until one or more of its pins overlap with the wire, then drop it. Instant connection!

Now you can create connections while adjusting a wire. Drag an existing wire until it overlaps one or many pins of a component, then drop it, and they’ll become connected.

You can create many connections effortlessly while drawing a wire. Draw your wire in such a way that it overlaps multiple pins, then finish drawing. All of the pins will now be connected to the wire! This is super helpful if you have an IC, for example, that needs many pins down a line to be connected to the same net.
We’ve also added new alignment and snapping features, which provide visual guides to ensure that all objects on your schematic are nicely aligned. Just drag two objects near each other and, like magic, guidelines appear to help guide the alignment of your components.
💡 Tip: You can also highlight components and right click and quickly align vertically, horizontally, or space evenly.

Your quest for the perfectly aligned, clutter-free schematic isn't just a solo adventure. Flux Copilot shares your, let's say, 'enthusiastic precision.'
With the power of AI at your fingertips, Flux Copilot transforms the art of schematic design into a collaboration with technology. It's not just an assistant; think of it as your detail-obsessed partner in design. Got two components that need a connection? Just whisper sweet nothings (or, you know, actual instructions) to Copilot, and watch it work its magic.
Copilot is here to help you work not just faster or smarter, but at warp speed towards creating that breathtakingly beautiful schematic. Because in the end, a more readable schematic doesn't just mean easier collaboration—it means creating something truly spectacular, together. Sign up for Flux today.
Ready to give Flux’s schematic improvements a try? Start with one of our reference designs today.
We’re launching our Stackup Editor: a new and improved way to select your PCB stackup that requires less time, less effort, and is less prone to errors. This is another massive step towards creating a single place where designers can collaborate with each other and the industry as a whole.
Selecting your PCB’s stackup has always been painstaking and unintuitive. First, you have to talk to the fabrication house, who will send you their stackup capabilities and tolerances via email and PDF. Then, it’s your job to take that information and transpose it back into your design tool, double and triple-checking that you didn’t make any errors in the process. So much back and forth inevitably leads to disorganization, information loss, and sometimes even failure. Not to mention lost time in the process.
If fabrication houses have standardized stackups, why are there so many hoops to jump through just to implement them into your design?
With Flux’s Stackup Editor, we change the narrative. With a simple and intuitive interface built into the tool, the Stackup Editor gives engineers an improved stackup workflow. Just go to your PCB layout, select “Stackup” under “Object-specific rules”, and find everything you need in one centralized location.
Not only can you edit and create stackups with minimal effort, but you can now also leverage Flux’s community of over 175,000 electrical engineers to take the hard work out of the process. With thousands of projects available to you from the community, you never have to start from scratch. Instead, you can simply find a project that is similar to yours and use that stackup as a template for your own design.
Finally: stackups no longer live in your email inbox, they live in the tool. And with that, you can save yourself from the wasted time, money, and effort that has been industry-standard for far too long.
More importantly, the addition of Stackup Editor aligns with our ultimate goal of creating a single, centralized platform for all of the hardware industry to collaborate.
With the Stackup Editor, fabrication houses themselves can directly input their stackup options into Flux as templates for designers to choose from. Just go to the fabrication house’s Organization page, find a stackup template from them that matches your project, and fork it for your own design.
At launch, you can choose from dozens of Stackup templates, including:
With that kind of first-party input from the houses themselves, you can feel confident that your stackups are ready for production before you even get there.
The Stackup Editor is another massive step towards creating a single place where designers can collaborate with each other and the industry as a whole. Now Flux offers one place where you can directly access parts from suppliers, designs and references from manufacturers, and stackups from fabrication houses.
If you want to get hands-on with the Stackup Editor, check out some of our templates and get started today!
For months, we’ve been adding new features and functions to Copilot to help make it the most powerful AI for hardware design in the world. Today, we’re announcing what might be the biggest upgrade yet: Copilot Vision.
Now, not only can you chat with Copilot, but you can also show it what you're working on. What does that mean? Copilot is now the first multi-modal AI for hardware design, and with that, a whole new world of possibilities has opened up for Flux users.
Hardware design can be tricky because so much of the thinking is visual and requires context. As an engineer, you’re expected to rely on visual resources like block diagrams, charts, and drawings. But these resources are usually confusing to interpret and separate from your actual design, making them lose their value quickly.
With Copilot Vision, you can now provide Copilot with images as a more natural way to communicate ideas and integrate those resources into your design. Imagine snapping a photo of a block diagram and Copilot instantly understanding what you're trying to build.
Simply provide Copilot an image as a file upload and ask your questions. Suddenly, visual resources are relevant and even powerful for sanity checks. Now, you can ask questions, learn, and get design reviews in entirely new and more effective ways.
Imagine you’re working on a project that’s based on an existing block diagram. You need to turn that block diagram into a working circuit, selecting the right components and connecting them in the right way. Normally this would mean reading through datasheets and application notes, but that gets confusing, time-consuming, and hard to keep track of.
Now that Copilot has vision, you have access to powerful new use cases that improve your hardware design workflow.
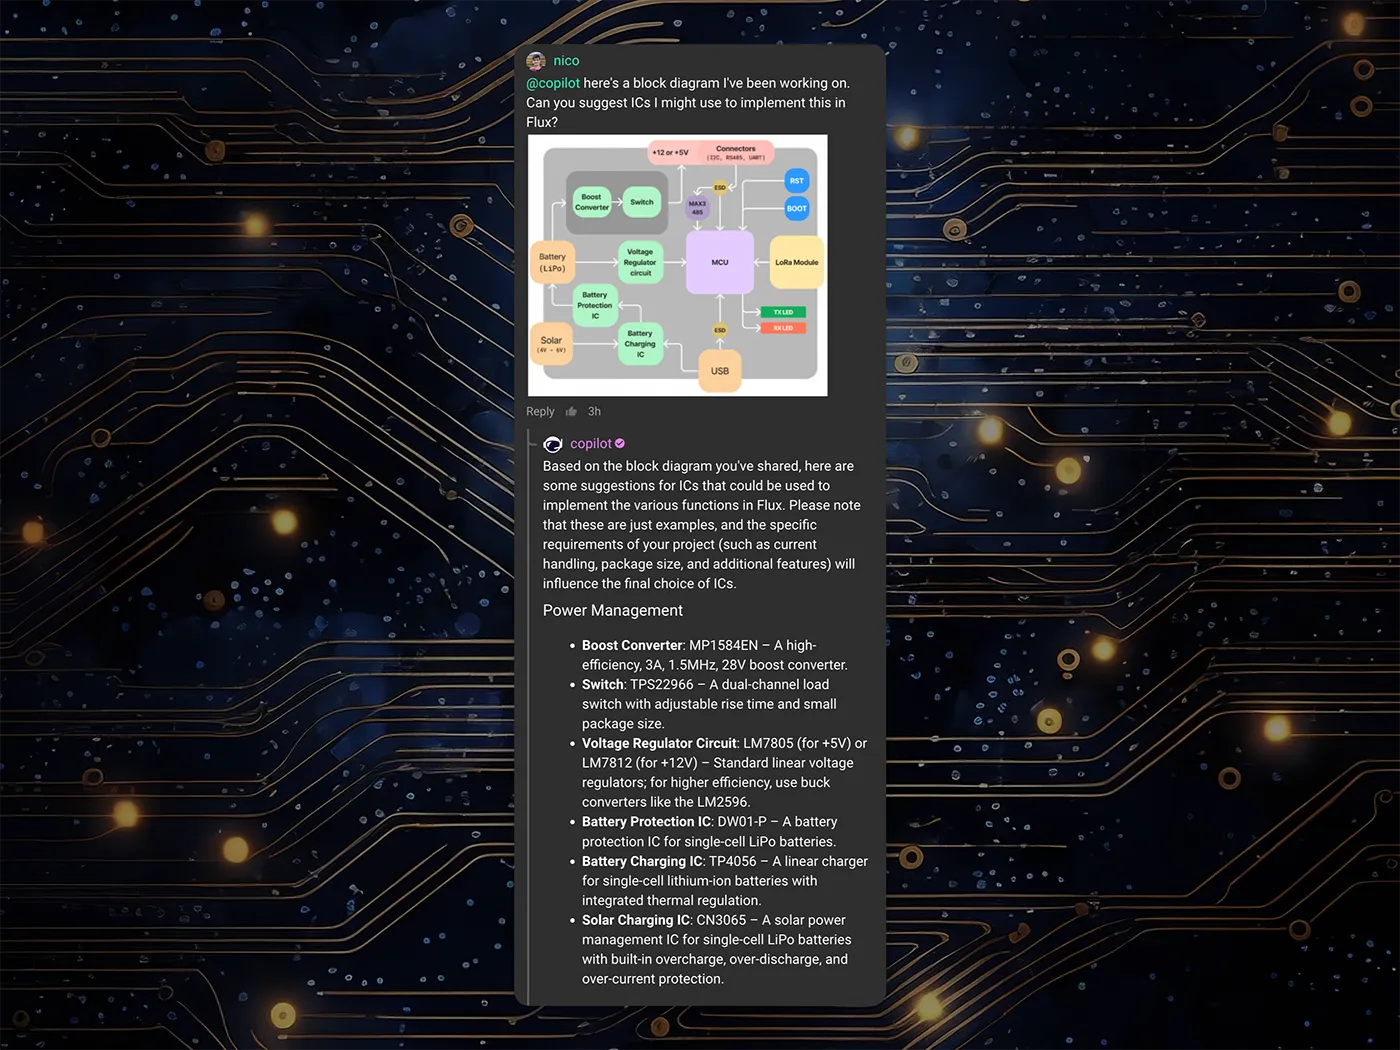
Part Recommendations: Trying to find the right parts to implement your design? You can now input a block diagram to Copilot and watch it recommend suitable parts for your design by intelligently parsing the diagram into functional sections.
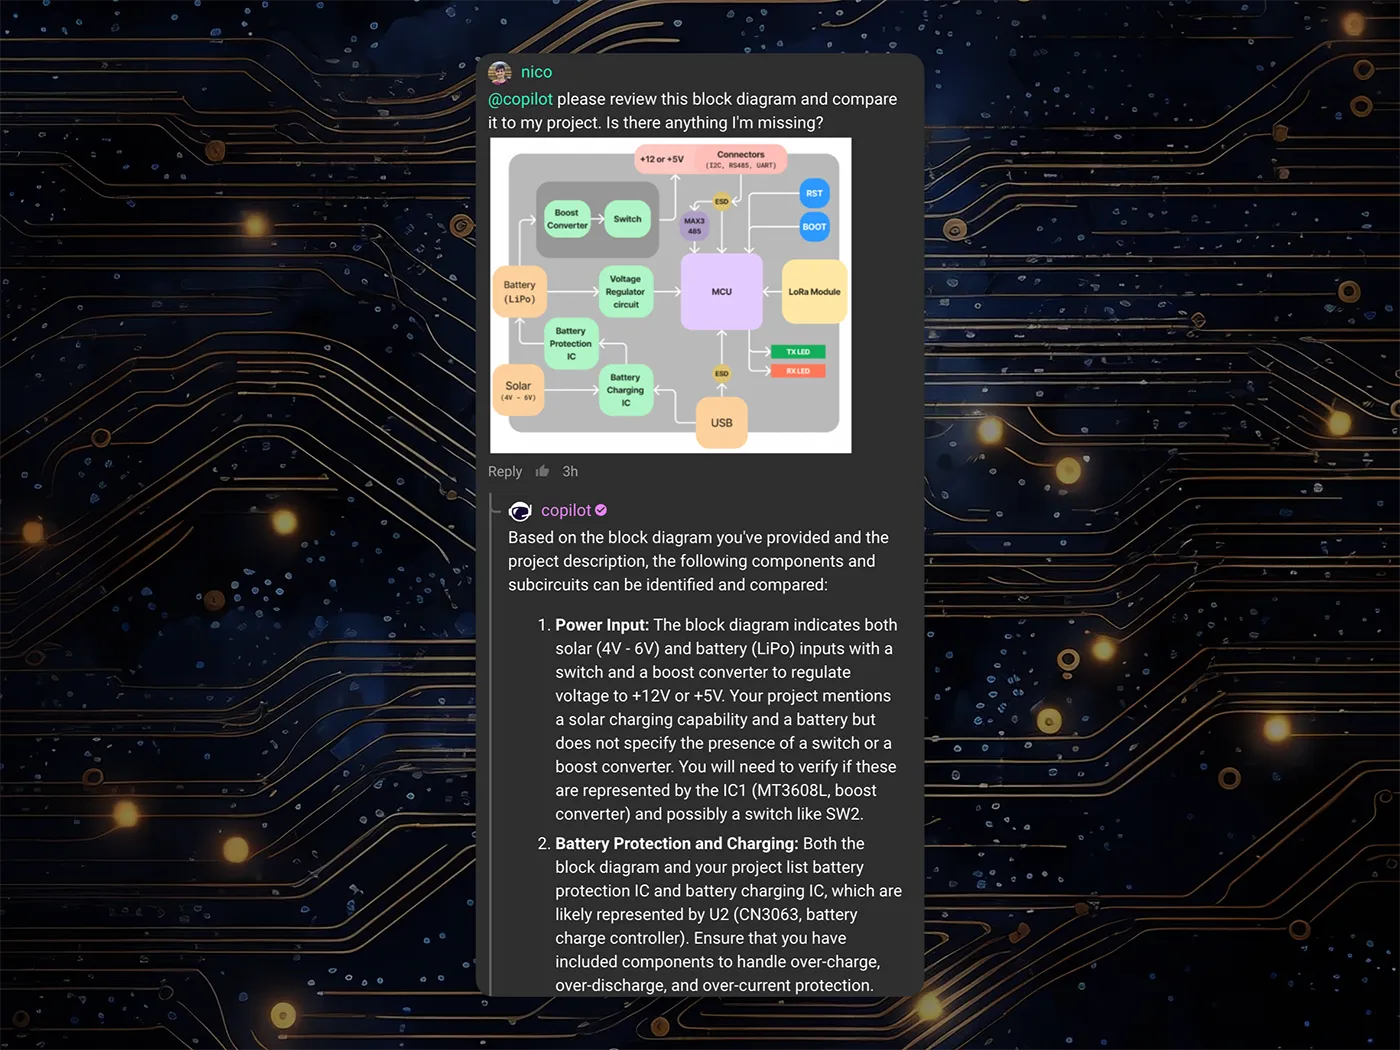
Design Review: Once you make your design, you’ll want to make sure you didn’t miss anything. Copilot can help ensure design quality by comparing your schematic diagram against a block diagram. Copilot's analysis catches discrepancies, such as missing elements in your design that appear in the diagram, and offers you suggestions for improvement.
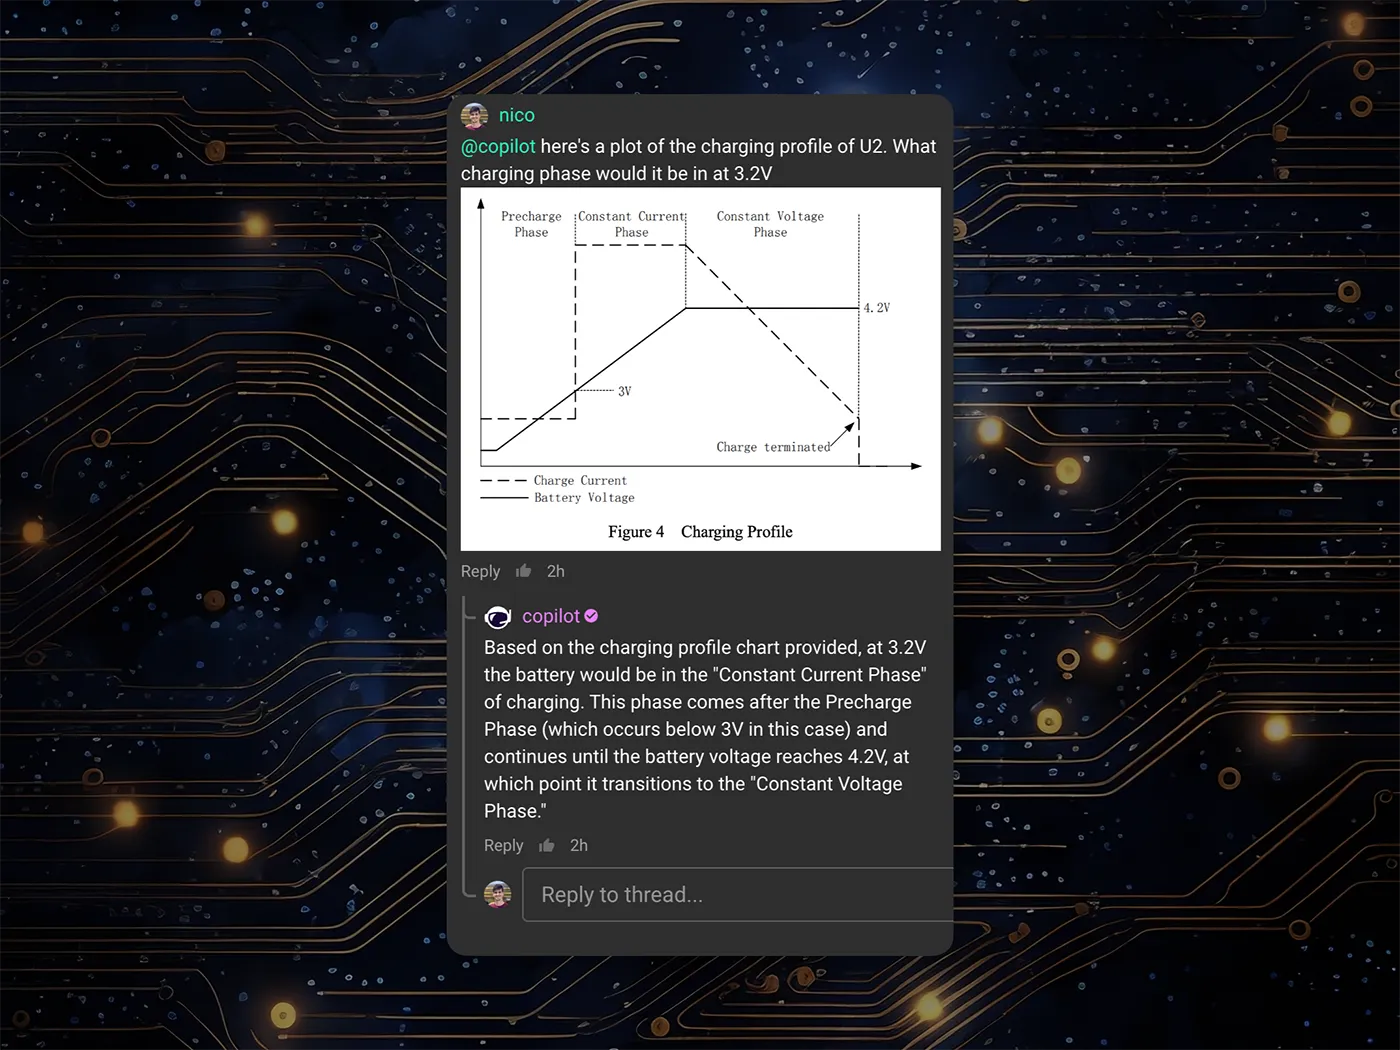
Chart Interpretation: Confused about how to interpret a chart on a datasheet? Just provide Copilot with an image of the chart and ask it in-depth questions. It will interpret your input and explain any aspect of the chart and how it relates to your hardware design needs.
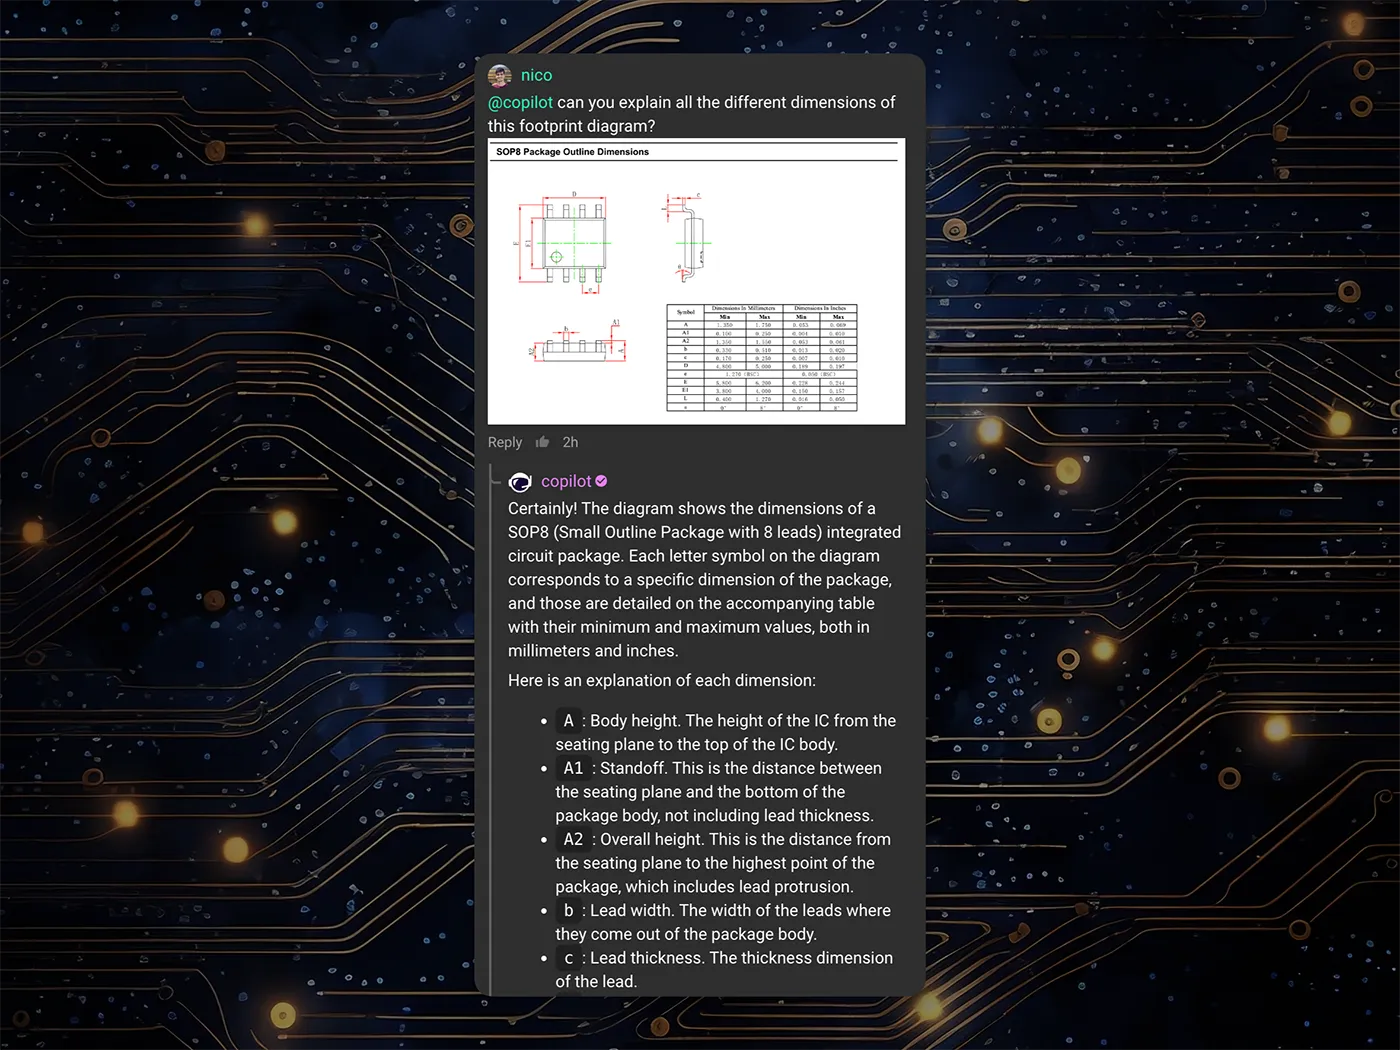
Dimensional Analysis for Footprints: Have you ever looked at the part drawings and been overwhelmed by all the information and dimensions? Now you can provide an image to Copilot and ask it any question about part dimensions. Copilot efficiently interprets and correlates them to real component footprints, even making educated guesses about component types based on project context.
This is a major step forward for Copilot, but we’re just scratching the surface of what’s possible. We believe that vision unlocks the doors to so much more down the road, but we’ll need your help! By trying out Copilot with vision, you can help us identify new use cases and steer the direction of Copilot’s future.
Try out Copilot today, and share your feedback with us through our Slack community. Tell us what works well, what could be better, and what other modes of interaction would you want to see us build into Copilot.
Today, we're thrilled to unveil Copilot Experts – a new suite of specialized AI models, each fine-tuned for specific tasks to deliver sharper accuracy and faster performance. Now, you have the power to easily select the AI model that best suits your current task, ensuring more precise and swift responses.
Today, we're thrilled to unveil Copilot Experts – a new suite of specialized AI models, each fine-tuned for specific tasks to deliver sharper accuracy and faster performance. Now, you have the power to easily select the AI model that best suits your current task, ensuring more precise and swift responses.
Accessing Copilot Experts is a breeze. Simply click on the Copilot icon in the comments or chat window, and select your desired expert from the dropdown menu. At launch, we are excited to introduce three distinct expert models:
Meet the original Copilot model, now known as the Generalist. This model is your versatile, jack-of-all-trades assistant, ready to tackle a wide array of queries with the same efficiency you've come to appreciate.
For instance, ask the Generalist:
@copilot can you explain to me what’s happening in this circuit?
The Librarian shines when it comes to parts inquiries and effortlessly navigating through datasheets. If you're looking to delve into specifics about a component, the Librarian is your go-to expert.
@copilot am I using the right amount of decoupling for U1?
This is your go-to for Flux product guidance. Have questions about how to use the tool? Don’t feel like sifting through the documentation? Just ask the Help Expert for the answers. For example:
@copilot how do I change the stackup of my PCB?
We recently launched Copilot Shortcuts, which are powerful pre-made questions that you can ask Copilot with the click of a button. With Experts, those Shortcuts now automatically route to the best Expert for the job - meaning you get the best answers without having to do any work.
Copilot Experts is a testament to all of the feedback we’ve gotten from the community over the last year. Try out the Copilot Experts today to see how we’re taking your feedback, and using it to make the best AI tool in the industry!


